niedziela, 6 grudnia 2015

Ubuntu mikrofon

sudo apt-get purge pulseaudio


I restart. A potem w mikserze (nie w gnomowym, ale np. w alsamixer) ustawienie wszystkiego na maksa


Ja bym jeszcze spróbował co ci pokażę

Cytuj:
arecord -l


a później dałbym 

Cytuj:
arecord plik 


i powiedział kilka zdań do mikrofonu (w miarę możliwości blisko)

Następnie zobaczył czy jest jakiś dzwięk odpalając :

Cytuj:
aplay plik

piątek, 4 grudnia 2015

Simple firewall Ubuntu and Mikrotik

UBUNTU:


  • sudo apt-get update
  • sudo apt-get install iptables-persistent
  • sudo nano /etc/iptables/rules.v4
/etc/iptables/rules.v4
*filter
# Allow all outgoing, but drop incoming and forwarding packets by default
:INPUT DROP [0:0]
:FORWARD DROP [0:0]
:OUTPUT ACCEPT [0:0]

# Custom per-protocol chains
:UDP - [0:0]
:TCP - [0:0]
:ICMP - [0:0]

# Acceptable UDP traffic

# Acceptable TCP traffic
-A TCP -p tcp --dport 22 -j ACCEPT

# Acceptable ICMP traffic

# Boilerplate acceptance policy
-A INPUT -m conntrack --ctstate ESTABLISHED,RELATED -j ACCEPT
-A INPUT -i lo -j ACCEPT

# Drop invalid packets
-A INPUT -m conntrack --ctstate INVALID -j DROP

# Pass traffic to protocol-specific chains
## Only allow new connections (established and related should already be handled)
## For TCP, additionally only allow new SYN packets since that is the only valid
## method for establishing a new TCP connection
-A INPUT -p udp -m conntrack --ctstate NEW -j UDP
-A INPUT -p tcp --syn -m conntrack --ctstate NEW -j TCP
-A INPUT -p icmp -m conntrack --ctstate NEW -j ICMP

# Reject anything that's fallen through to this point
## Try to be protocol-specific w/ rejection message
-A INPUT -p udp -j REJECT --reject-with icmp-port-unreachable
-A INPUT -p tcp -j REJECT --reject-with tcp-reset
-A INPUT -j REJECT --reject-with icmp-proto-unreachable

# Commit the changes
COMMIT

*raw
:PREROUTING ACCEPT [0:0]
:OUTPUT ACCEPT [0:0]
COMMIT

*nat
:PREROUTING ACCEPT [0:0]
:INPUT ACCEPT [0:0]
:OUTPUT ACCEPT [0:0]
:POSTROUTING ACCEPT [0:0]
COMMIT

*security
:INPUT ACCEPT [0:0]
:FORWARD ACCEPT [0:0]
:OUTPUT ACCEPT [0:0]
COMMIT

*mangle
:PREROUTING ACCEPT [0:0]
:INPUT ACCEPT [0:0]
:FORWARD ACCEPT [0:0]
:OUTPUT ACCEPT [0:0]
:POSTROUTING ACCEPT [0:0]
COMMIT
Test your rules file for syntax errors:
  • sudo iptables-restore -t < /etc/iptables/rules.v4
ADD rules
sudo iptables-restore < /etc/iptables/rules.v4
If no syntax errors are displayed, reload the firewall to implement the new rule set:
  • sudo service iptables-persistent reload
Mikrotik
/ ip firewall filter
add chain=input connection-state=established comment="Accept established connections"
add chain=input connection-state=related comment="Accept related connections"
add chain=input connection-state=invalid action=drop comment="Drop invalid connections" 
add chain=input protocol=udp action=accept comment="UDP" disabled=no 
add chain=input protocol=icmp limit=50/5s,2 comment="Allow limited pings" 
add chain=input protocol=icmp action=drop comment="Drop excess pings" 
add chain=input protocol=tcp dst-port=22 comment="SSH for secure shell"
add chain=input protocol=tcp dst-port=8291 comment="winbox" 
# Edit these rules to reflect your actual IP addresses! # 
add chain=input src-address=159.148.172.192/28 comment="From Mikrotikls network" 
add chain=input src-address=10.0.0.0/8 comment="From our private LAN"
# End of Edit #
add chain=input action=log log-prefix="DROP INPUT" comment="Log everything else"
add chain=input action=drop comment="Drop everything else"

czwartek, 26 listopada 2015

Czyszczenie Profili Windows

To clear user local profile via registry:
  1. Press on Start > Run >Regedit
  2. Navigate to the following registry key :“HKEY_LOCAL_MACHINE\SOFTWARE\Microsoft\Windows NT\CurrentVersion\ProfileList
  3. Under ProfileList navigate to binary key’s like this: S-1-5-21-3656904587-1668747452-4095529-500
  4. On the right side under ProfileImagePath you’ll see the profile path.
  5. Chose the one with the desired user and delete the long registry key like: “HKEY_LOCAL_MACHINE\SOFTWARE\Microsoft\Windows NT\CurrentVersion\ProfileList”
Sprawdzone też na serwerze terminalowym pod Windows Server 2012 R2

środa, 4 listopada 2015

Update ad Z 2008 na 2012

  • Update  Active Directory z 2008 na 2012 

Dodajemy Nowy serwer np. Dc3 
Mozna podnieść funkcjonalność Dopiero wtedy gdy pozbędziemy sie starych kontrolerów 
 raise domain funcional level 
 rasie forest funcional level 

Przenieść role fsmo Na dc3 prawym i operatorska master i wszędzie change 
Następnie active directory domains nad trust prawym operations master i change 
Następnie regsvr32 schmmgmt.dll 
Mmc 
Wybieramy w mmc active directory schema 
Pamiętaj aby być na nowym dc np. Dc3 prawym operations master o change 

Sprawdzamy gdzie pa aktywne role fsmo 
Netdom query fsmo 

Depromo na starych serwerów Obojętnie który pierwszy 
Odinstalowanie rolę And feature active directory domain service Musi przejść prawidłowo opcja "demote" 

Aktywację nowych kontrolerów Czyli podniesienie funkcjonalności 
!!!! Warto zajrzeć do artykułu transferowaniei przejmowanie ról fsmo narzędziem ntdsutil

wtorek, 27 października 2015

Który katalog zajmuje najwięcej w systemie

- Windows
polecam WinDirStat
- Linux cli
du -m /home | sort -rn

piątek, 23 października 2015

Skrypt - ping adresów IP pobranych z pliku - POWERSHELL

 Plik.csv 
IP 
127.0.0.1 
8.8.8.8 
1.1.1.1 
---------- 

$dane = import-csv -patch c:\temp\plik.csv 
#plik pierwsza linia wpis IP 
#$dane.ip 
Foreach ($d in $dane) 
{ 
Ping $d.ip 
}


KATALOGI

Set-ExecutionPolicy Unrestricted
$katalogi = dir -name

Foreach ($d in $katalogi)
{
Write-Host $d
xcopy \\MP153\profile\*.* \\MP153\profile\TEST\$d\S200 /E /Y /V
}

wtorek, 20 października 2015

Can’t download any updates on windows server 2008 r2

 Can’t download any updates on windows server 2008 r2


customer server running windows server 2008 r2 can not use windows update to check updates or download updates automatically.

1 try to rebuild windows download database

run cmd in administrator privilege then run:

net stop wuauserv
Rename c:\Windows\SoftwareDistribution SoftwareDistribution_OLD
net start wuauserv

2 install KB 947821

for windows 2008 r2 & windows 7: [300MB]

http://www.microsoft.com/downloads/en/details.aspx?FamilyID=914fbc5b-1fba-4bae-a7c3-d2c47c6fcffc&displaylang=en

when start install 947821, it will check windows update settings and correct all things, so it will take a period based on your server and network environment. for this situation it takes about 30mins.

for detail please check http://support.microsoft.com/kb/947821


Fix:
https://support.microsoft.com/pl-pl/gp/windows-update-issues/en-us

Albo użyć narzędzia winfixtool firmy Anvisoft
http://www.anvisoft.com/windows-update-downloader.html

poniedziałek, 19 października 2015

Panel Sterowania jako Administrator

Jak uruchomić Panel Sterowania jako Administrator

Musisz użyć komendy RUNAS
  • otwórz menu start
  • w Windows XP kliknij na przycisku "Uruchom"
  • w Vista i Win7 możesz to zrobić bezpośrednio w okienku szukania
runas /username:computername\Administrator "rundll32.exe shell32.dll,Control_RunDLL sysdm.cpl"
teraz możesz zmienić nazwę użytkownika, nazwę komputera, wyświetlić "właściwości systemu" itp.
Poniżej lista opcji w których możesz dokonywać zmain:

  • Change sysdm.cpl to any of the following:
Dostępy – access.cpl
Dodawanie nowych urządzeń – hdwwiz.cpl
Dodanie/Usunięcie nowego oprogramowania – appwiz.cpl
Data/CzasWłaściwości – timedate.cpl
Właściwości – desk.cpl
SzybkieWyszukanie – findfast.cpl
Właściwości Internet – inetcpl.cpl
Właściwości Joystick – joy.cpl
Właściwości Keyboard – main.cpl
Zarządzanie Lokalnymi Urzytkownikami – nusrmgr.cpl
Microsoft Exchange – mlcfg32.cpl
Microsoft Mail Post Office – wgpocpl.cpl
Właściwości Modemu – telephon.cpl
Właściwości Myszy – main.cpl
Właściwości Multimedia – mmsys.cpl
Właściwości Sieci – Ncpa.cpl
Właściwości Haseł – password.cpl
Opcje Zasilania – powercfg.cpl
Opcje Regionalne – intl.cpl
Właściwości Dzwięku – mmsys.cpl
Właściwości Systemu – sysdm.cpl

czwartek, 1 października 2015

net use z hasłem

@echo off
set /p pass=Wpisz haslo:
echo %pass%

net use w: \\(server)\share  /user:domena\jkowalski %pass%

poniedziałek, 28 września 2015

Instalacja systemu windows na inny dysk niż C:

Jak zrobić serwer terminali na dysku M:

http://blog.pcfreak.de/2012/07/19/install-windows-server-2008-r2-to-a-different-drive-letter-then-c/comment-page-1/


WAŻNE !!!!
zapisać plik z kodowaniem Unicode tak aby

type AutoUnattended.xml 

wyświetlilo prawidłowo


=========
2 sposób

przygotować plik AutoUnattended.xml  i wgwać go do iso instalacyjnego (do głównego folderu)

 http://www.winiso.com/support/tutorials/edit-iso.html

piątek, 25 września 2015

IOSTAT, IOTOP, TOP

http://www.varlog.pl/2010/02/10-narzedzi-ktore-musi-znac-kazdy-administrator/


yum install sysstat

  iostat

iostat – jest narzędziem prezentującym wykorzystanie naszych urządzeń blokowych, czyli w praktyce jest to monitorowanie pracy dysków twardych, tzw. I/O. Saturacja dysków twardych jest zjawiskiem bardzo niepożądanym, które automatycznie przekłada się na zwolnienie pracy całego systemu, dzięki iostatowi, możemy szybko się przekonać czy przyczyna naszych problemów leży właśnie w za dużym wykorzystaniu zasobów I/O.
Przykładowe użycie: iostat -x 1
avg–cpu:  %user %nice %system %iowait %steal %idle
0,46    0,00    0,08    0,02    0,00   99,44
Device rrqm/s wrqm/s r/s w/s rsec/s wsec/s avgrq–sz avgqu–sz await svctm util
sda 0,09 0,77 0,07 0,23 2,69 7,87 35,74 0,00 4,49 0,84 0,02
W wyniku widzimy dane dla naszego urządzenia ‚sda‚.
  • rrqm/s – ilość skolejkowanych żądań odczytu z dysku na sekundę
  • wrqm/s – ilość skolejkowanych żądań zapisu na dysk na sekundę
  • r/s – ilość odczytów z dysku na sekundę
  • w/s – ilość zapisów na dysk na sekundę
  • rsec/s – ilość sektorów czytanych na sekundę
  • wsec/s – ilość sektorów zapisywanych na sekundę
  • avgrq–sz – średni rozmiar w sektorach
  • avgqu–sz – średnia wielkość kolejki oczekujących żądań dostępu do dysku
  • await – średni czas dostępu do dysku (z uwzględnieniem kolejki) w milisekundach
  • svctm – średni czas obsługi żądania w milisekundach
  • %util – procentowe zużycie procesora potrzebne do obsłużenia żądania, jeśli wynosi 100% dochodzi do sytuacji saturacji zasobów
Jeśli wskazania iostata pokazują utylizację na poziomie 80-100% należy znaleźć przyczynę i ją wyeliminować, sytuacja ta oznacza, że nasz procesor spędza głównie czas w oczekiwaniu na dane a nie na ich przetwarzaniu.


iotop


Na jednym z serwerów zauważyłem dziwny wzrost obciążenia. Tzw. LOAD od kilku dni po woli rósł. top pokazywał że dwa rdzenie CPU czekają na dane z dysku – tzw. io wait na poziomie 80~90% ale żaden proces w znaczącym stopniu nie obciążał CPU.
Jest kilka narzędzi (iostat, wmstat), które pozwalają monitorować obciążenie dysków ale ja nie szukałem informacji czy i w jakim stopniu dyski są obciążone – wiedziałem że są. Chciałem dowiedzieć się który proces generuje to obciążenie – by móc go ubić :-)
Przydatny okazał się programik iotop – który działa jak top ale sortuje procesy w zależności od generowanego przez nie obciążenia dysków – właśnie tego szukałem:


iotop
Zrzut z programu iotop
Program jest w standardowych repozytoriach Debiana i można go zainstalować w ten sposób:
apt-get install iotop


TOP
 
TOP 
VIRT - to co mysli ze mam, RES -> tyle ile faktycznie ma, 
s-STAN np. z - zombie, przy CPU id-ile proces byl nieuzywany, 
wa - io/wait po tym mozna sprawdzic czy nie potrzebujemy szybszego dysku, 
hi -> przerwania  
< > - sortowanie albo po lewej albo po prawej kolumnie, 
R -> od najwiekszych do najmniejszych 
1 -> pokazuje ilosc procesorow 
NI - nice, priorytet. Dziala tak ze jak ktos ma wiekszy NICE to ma mniej procesora. 
Zeby przyspieszyc np tylko jeden proces nalezy dac komus NIC ujemny. 
r - zmieniamy NICE. Minusowe wartosci da sie robic tylko z konta roota. 
k - killuje 
load avarage -> jak obciazany jest system, 
ilosc procesow ktore stoja w jakiejs kolejce do egzekucji. 
Kazdy system moze inaczej, powyzej 1-ego juz wiadomo ze jest troche obciazony.  

środa, 23 września 2015

ADD and DEL disc linux no reboot

Sprawdzamy

dmesg | grep sdb

# partx -l /dev/sdb 

# partx -v -a /dev/sdb  

/dev/mapper# vgscan --mknodes

  lvscan -l


Step # 2: Rescan the SCSI Bus to Add a SCSI Device Without rebooting the VM

A rescan can be issued by typing the following command:
 
"""W jednej lini 
ls /sys/class/scsi_host/ | while read host ; 
do echo "- - -" > /sys/class/scsi_host/$host/scan ; done

"""

fdisk -l
tail -f /var/log/message


=====================================================


How Do I Delete a Single Device Called /dev/sdc?

In addition to re-scanning the entire bus, a specific device can be added or existing device deleted using the following command:
# echo 1 > /sys/block/devName/device/delete
# echo 1 > /sys/block/sdc/device/delete

How Do I Add a Single Device Called /dev/sdc?

To add a single device explicitly, use the following syntax:
# echo "scsi add-single-device    " > /proc/scsi/scsi
Where,
  • : Host
  • : Bus (Channel)
  • : Target (Id)
  • : LUN numbers
For e.g. add /dev/sdc with host # 0, bus # 0, target # 2, and LUN # 0, enter:
# echo "scsi add-single-device 0 0 2 0">/proc/scsi/scsi
# fdisk -l
# cat /proc/scsi/scsi


=========================================================

Step #3: Format a New Disk

Now, you can create partition using fdisk and format it using mkfs.ext3 command:
# fdisk /dev/sdc
# mkfs.ext3 /dev/sdc3

Step #4: Create a Mount Point And Update /etc/fstab

# mkdir /disk3
Open /etc/fstab file, enter:
# vi /etc/fstab
Append as follows:
/dev/sdc3               /disk3           ext3    defaults        1 2

czwartek, 17 września 2015

Redhat 7 instalacja,rejestracja

Update Redhat

yum update
 
Tworzenie skryptów autostart


Create the file (touch>chmod>edit seems recommended, I don't known why):
touch /etc/systemd/system/activefolder.service 
chmod 664 /etc/systemd/system/activefolder.service 
vim /etc/systemd/system/activefolder.service 
 
/etc/systemd/system/activefolder.service example:
 
[Unit] Description=activefolder 
After=network.target [Service] 
WorkingDirectory=/var/www/activefolder/current 
ExecStart=/var/www/activefolder/current/script/delayed_job start 
Type=forking PIDFile=/run/activefolder.pid 
Environment="RAILS_ENV=production" 
#User=httpd 
#Group=httpd 
 [Install] WantedBy=default.target
Then:
systemctl daemon-reload 
systemctl start name.service 

LUB


$ crontab -e

Run a script called /home/vivek/bin/installnetkit.sh
@reboot /home/vivek/bin/installnetkit.sh

Start crond automatically at boot time
You also need to enable crond service via sys v / BSD init style system. Under RHEL / CentOS / Fedora, you need to use chkconfig (ntsysv) command to enable crond on boot:
# chkconfig crond on
## Commands to start/stop/restart crond ###
# service crond restart
# service crond start
# service crond stop


Rejestracja i subskrypcja

subscription-manager register --username admin-example --password secret --auto-attach
 
Network
 
nmcli con mod net-eth0 connection.autoconnect yes  

wtorek, 8 września 2015

Clustering using sharing of vmdks between virtual machines

https://communities.vmware.com/blogs/Abhilash_hb/2013/08/25/clustering-using-sharing-of-vmdks-between-virtual-machines


This blog post explains how to share a VMDK between two virtual machines so they can be clustered or any application that needs two machines to share their disks.
  
    Assume there are two VMs that participate in the clustering
    Node-01 and Node-02

    Create a Virtual disk on Node-01 that has to be shared with Node-02
1.jpg


    Add a hard disk by clicking on Add a hardware and select Hard disk and click Next
2.jpg


   Select Create a new virtual disk
3.jpg


Must be type Thick Provision Eager Zeroed !!!!!!!!!!!!!!!!!!


    Choose SCSI (1:0) which creates a fresh SCSI controller apart from the default one created during virtual machine creation and click Next
4.jpg


    Click on Finish
5.jpg


    Click on the newly created SCSI controller and change the SCSI Bus sharing option to “Physical
6.jpg
   Click on OK and power ON the machine

    Now the newly added disk shows up on the Node-01 machine as /dev/sdb.
7.jpg

     We need to add the Virtual disk created on Node-01 to Node-02

   
     Click on Edit Setting of Node-02 machine and select Add hardware and click on hard disk
     And click Next
8.jpg

    Click on “use an existing virtual disk” and click Next
9.jpg

 
    Browse to the location where Node-01’s VMDK file is present and select it
10.jpg


     Confirm the path and click Next
11.jpg


    Select SCSI (1:0) which creates a new SCSI controller on Node-02
12.jpg


     Review the changes and click Finish
13.jpg


    Select the newly created SCSI controller and select Physical under SCSI bus sharing option and click OK
14.jpg

    Power on Node-02 and confirm that Node-01’s shared disk is showing up on Node-02
15.jpg

   You might want to turn the Multi-writer flag in the advanced options of VM so you can let the machines write to the disk. Follow the below link for the same

   Note: This might cause some problems while doing vMotion of the machines involved in clustering. So do some research before you do it.

piątek, 4 września 2015

Cluster HAProxy

Configuring HAProxy and Keepalived - HTTP

Install HAProxy and Keepalived on both ubuntu nodes.
Load balancing in HAProxy also requires the ability to bind to an IP address that are nonlocal, meaning that it is not assigned to a device on the local system. Below configuration is added so that floating/shared IP can be assigned to one of the load balancers. Below line get it done.
Now you know what’s happening with above lines let’s edit the sysctl.conf.
Add the below lines.
To enable the changes made in sysctl.conf you will need to run the command.

Now let’s create keepalived.conf file on each instances. All the below Keepalived configurations are explained in the User guide provided by Keepalived and refer this guide as well.
Add the below configuration on the master node

Add the below configuration on the slave node.
Restart Keepalived.
Now let’s configure HAProxy on both instances. You will have do the below steps on master node as well as slave node.
set the property ENABLED to 1.
Note that below configurations are as per my requirement.
If above configurations are not clear please refer this guide from HAProxy.

Testing

Let’s check whether our configuration has been done correctly. Try executing ip addr on master node. As you can see on the master node 192.168.6.164 IP is assigned.
Try executing ip addr on slave node.
Let stop the HAProxy on the master node. Now you can see that IP address 192.168.6.164 will be assigned to the salve node. If you start HAproxy instance on the master node IP address 192.168.6.164 will be assigned back to master node. See the O/P below.
Try http://192.168.6.169:8989/stats or http://192.168.6.170:8989/stats URL to login into statistics report for HAProxy.
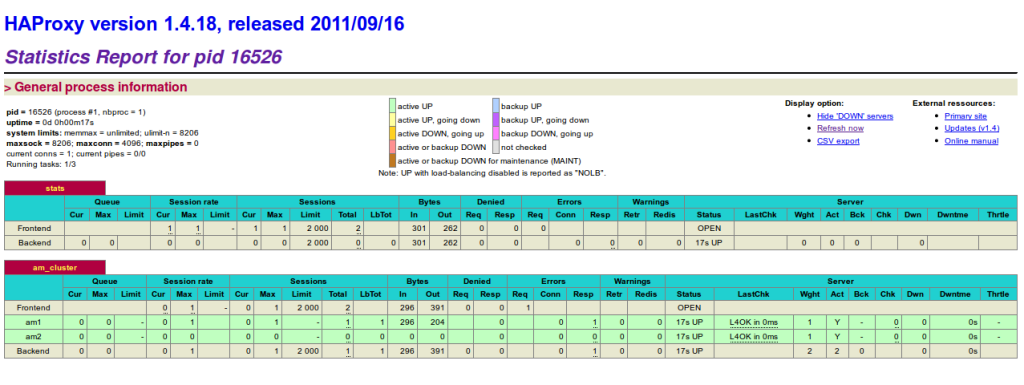
Statistics Report for HAProxy
If you have any questions let me know in the comments below. Your feedback is highly appreciated(happy-face).